fastlane
- 用于配置
iOS和Android的持续集成的神器 Fastlane是一套工具,帮助你简化和自动化 App 发布或部署的过程,将之变成一条平直的工作流Fastlane是用Ruby语言编写的一套自动化工具集和框架,每一个工具实际都对应一个Ruby脚本,用来执行某一个特定的任务Fastlane核心框架则允许使用者通过类似配置文件的形式,将不同的工具有机而灵活的结合在一起,从而形成一个个完整的自动化流程Fastlane是一个ruby脚本集合,它可以按照我们指定的路线,在指定位置执行我们所要执行的操作。这里我们称这样的路线为「航道(lane)」,这样的操作称为Action- 到目前为止,
Fastlane的工具集大约包含170多个小工具,基本上涵盖了打包,签名,测试,部署,发布,库管理等等移动开发中涉及到的内容, 工具的描述和使用可参考: Action官方文档和Github源码 - 如果这些工具仍然没有符合你需求的,没有关系,得益于
Fastlane本身强大的Action和Plugin机制,如果你恰好懂一些Ruby开发的话,可以很轻易的编写出自己想要的工具
安装
确保ruby为最新版本
1
2
brew update
brew install ruby安装
fastlane1
sudo gem install -n /usr/local/bin fastlane
fastlane相关操作命令1
2
3
4
5
6
7
8// 查看当前fastlane版本
fastlane --version
// 查看所有action
fastlane actions
// fastlane初始化
fastlane init
fastlane 提交私有库
cd 到当前目录, 执行 fastlane init 命令
但是对于提交私有库来说这个过程会创建一些无用的文件, 包括双穿需要的 appleID 等, 有时我们不涉及这些, 所以我们还可以直接创建所需文件
1 | cd 根目录 |
接下来就是编写Fastfile文件内容
配置 Fastfile 文件
语法解析
fastlane init创建好文件后, 打开Fastfile文件, 默认内容如下
1 | default_platform(:ios) |
platform: 使用的平台desc: 描述航道的作用lane: 命名航道名称和相关Actioncustom_lane: 即为航道名称, 可自定义- 如需外界传递参数, 可在
do后面添加|options|
接受外界传递参数, 在添加
options后, 可定义如下参数1
tagName = options[:tag]
外部使用命令是, 即可通过xxx tag: 0.0.1 进行传值
fastlane 文件
- Fastfile文件的作用就是把正常使用的命令转成fastlane的语法, 并在该文件中执行, 可在官方文档中查找对应的语法
- 以==提交私有库到远程==为例, 就是把所有相关命令, 找到对应的fastlane命令写在Fastfile文件中执行
fastlane 文件配置
提交私有库时, 需要执行的命令如下
1 | // 将本地库更像到测试项目 |
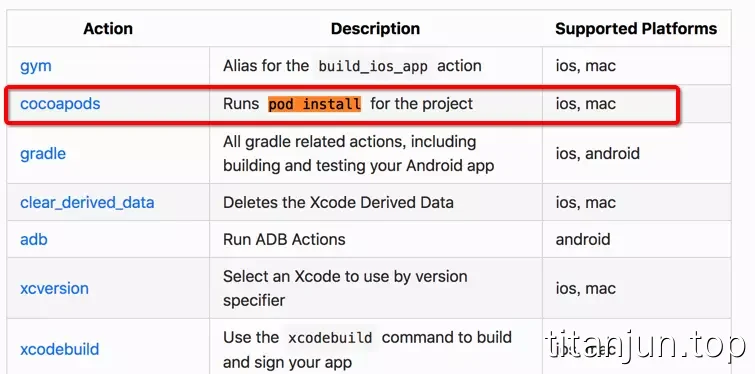
- 打开官方文档搜搜索
- 例如: 搜索pod install, 对应的即为cocoapods, 如下
编写的 Fastfile 文件配置内容如下, 可做响应的参考
1 | default_platform(:ios) |
- Fastfile文件编写完成, 需要检测文件语法是否有误, cd 进入根目录, 执行 fastlane lanes
- 如果没问题, 执行命令 fastlane 航道名称 参数1:值1 参数2:值2
- 示例: fastlane DownloadLane tag:0.1.0 target:TKDownLoad
- 正常情况下, 私有库已经被提交到远程仓库了, 并更新了对应的索引库
fastlane自动化打包并上传蒲公英
设置fastlane
1 | cd 项目主目录 |
会出现选择,选择 4 手动管理,执行完毕后目录下多了 fastlane目录 和 Gemfile,会卡住,其实已经完成了,control+C 取消,再执行一次
配置 Appfile文件 和 Fastfile 文件
配置这两个文件之前,先安装一下蒲公英插件,我这里用到自动上传ipa到蒲公英。
1 | fastlane add_plugin pgyer |
输入 y 继续,后续可能需要输入sudo密码进行安装。
打开 Appfile 文件,添加 app_identifier 和 apple_id,app_identifier 就是你的 APP 的 Bundle identifier,apple_id 是你的开发者账号。
1 | app_identifier "com.app.app" |
配置fastlane文件:
1 | default_platform(:ios) |
执行自动打包
1 | fastlane APPEP |